1. Getting the sample
2. Fixation
3. Dehydration, embedding
4. Sectioning
5. Ironing
6. Staining
7. Mount
8. General advices
An artifact may be defined as a non-desired alteration in a sample caused by the histological processing. It can be empty spaces, breaks, folds, bad staining, precipitates, air bubbles, and many others. Artifacts are sometimes inevitable, but in many cases they are a consequence of a bad histological processing. To be aware of artifacts is essential to get a good diagnosis during observation, especially if it is a pathological sample.
Artifacts can be produced in each of the steps of the histological process, from obtaining the sample until the mounting of the stained section with a coverslip. Let's describe some artifacts according to the step of the histological technique where they can be produced: obtaining the sample, fixation, embedding, sectioning, staining and coverslipped.
1. Obtaining the sample
Many artifacts are caused by necropsy, mainly because the time from sample extraction to fixation is too long. For example, 3 minutes postmortem are enough to produce villi expansions in the intestinal mucosa. In addition, some sharpness is lost at the border of the cells and some epithelial cells may be detached, mostly in columnar epithelium. Therefore, the fixation of the sample must be as soon as possible after sample extraction, and the sample should be small. If the sample is large, or a small animal has to be processed, fixation by perfusion is recommended.
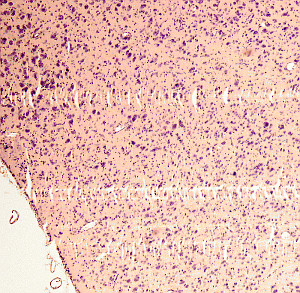
The sample has to be carefully obtained to prevent physical damages, such as deformation or perforations. These artifacts cannot be corrected during the histological processing (Figure 1). In biopsies, we must be aware of any pretreatment. For example, suture rests, some dyes for delimiting the region, talcum power from gloves, too much anesthetic, methods that required heat, and so on. These pretreatments may introduce alterations that need to be distinguished from normal tissue features.

Some samples are made up of tissues or structures with different hardness. This may cause breakages or empty spaces between the hard and the soft parts during the sample extraction. For example, the hardness of eye sclerotic and the softness retina usually lead to the detachment of the photoreceptor layer from the pigmented epithelium (something similar happens during the retinal detachment in vivo). This detachments lead to artifactual empty spaces.
2. Fixation
Many tissular alterations may be produced by fixation. For example, caused by choosing a non-suitable fixative, formation of pigments of hematein or acid formalin, adherence of the samples to the walls of the fixative container, inappropriate volume of fixative, the fixation time is too long or too short, the samples are too large, and so on.
In the fixation by immersion, samples larger than 6 mm are not recommended, and the fixative volume needs to be 20 times larger than the volume of the sample. Formalin 10 % is the common fixative in histopathology. Obtaining good quality sections is more difficult if a long-lasting fixation is performed. It increases the tissue hardness, and it may cause tissue retractions. It is a good practice to use a buffered and iso-osmotic fixative to prevent retractions and expansions of the tissue produced by hypotonic or hypertonic solutions, respectively. A long fixation affects the tissue consistence as well as its biochemical and reactive features. These make the tissue prone to false negative or false positive results. Sometimes, some contamination may be introduced during fixation if the fixative container has some metallic components, such as the bottle cap.
Before choosing the fixative, the embedding medium, the section apparatus and the staining protocol have to considered. For example, there are fixatives non-suitable for paraffin embedding, such as a high concentration of glutaraldehyde, osmium tetroxide, and acrolein. However, these fixatives are suitable for resin embedding.
3. Dehydration and embedding
If the sample has to be trimmed after fixation, non-needed tissue is removed. Only the wanted tissue should be embedded. Samples with parts that can de detached are processed individually to prevent embedding blocks with different types of samples.
Since paraffin is a non-hydrosoluble compound, paraffin embedding needs a previous dehydration, That is, the water is substituted by alcohol, and then by a clearing liquid (usually xylene), which is miscible with paraffin. If some water remains in the tissue, paraffin does not enter through all the sample and the embedding will be defective (Figure 2). Alcohols decrease gradation by catching water from the air and from the samples. Thus, it is convenient to use fresh prepared alcohols or with not many uses. If there is a poor embedding because a non-complete dehydration, samples can go back from paraffin, to xylene and to a decrease gradient of alcohols, and then a new embedding process can start again.

A poor dehydration may produce fixative crystal precipitates that remain in the tissue. In addition, remaining water in the sample leads to low quality sections, irregular staining and results in a more opacity of the tissues. However, if dehydration is excessive, tissues may become fragile and hard, which may affect sectioning and staining.
It is important that samples do not become air-dried during dehydration, specially during the clearing step before paraffin. Otherwise, air bubbles may be formed, which appear as empty spaces after embedding, surrounded by regions of compressed tissues. Retractions in the tissue may also appear when the clearing step is too long.
A deficient embedding may lead sections to be over-stretched when they are placed in warm water, and tissues may be separated from one another, as it happens with epithelia, cartilage and connective proper. Some breaks may also appear. A defective paraffin infiltration can be produced by poor fixation, dehydration, clearing or the embedding itself.
Traces of water or clearing liquid may produce folds during sectioning that are not ironed in warm water, neither when they are mounted on slides. These folds can retain dyes, and therefore they appear more intensely colored.
If the embedding compound is harder than the sample, breaks and folds are produced. It is also advisable not to manipulate the samples with overheated forceps during the embedding process.
4. Sectioning
A weak fixation of the blade to the microtome holder leads to sections with different thickness, or even the sample may be broken. This may also happen when the blade is orientated with a large or very small angle. The optimal blade angle is about 10 to 15 degrees in modern microtomes, although it can be adjusted. The blade compresses the sample when the angle is too sharp, usually more in the softer regions. Compression and dragging the sample occur when the blade edge is poorly sharp.
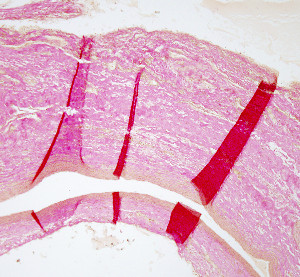
Sections may be shrinkage if a too thin section thickness is selected in the microtome. In addition, this sections may be more difficult to extend in warm water. Incomplete sections may be produced after a defective embedding. Stripes in the sections may be caused by dents in the blade edge (Figure 3). It is a good practice to completely surround the sample by the embedding media in the paraffin block so that the edge of the blade does not start cutting the sample but the embedding medium. Otherwise, the tissues may be distorted or damaged.

5. Extension of the sections
Sections are extended on warm distillate water. Thus, after water evaporation no crystal or precipitate remain. Sections has to be protected from dust or small particles during the water evaporation and drying on the slides.
Sections may be damaged if the water is too hot or too cold. If it is too hot, sections may get distended, and picnotic nuclei and nuclear bubbles may appear. The distribution of section onto the slides has to be in a way that they do no overlap during the extension (Figure 4).

Any air bubbles between the slide and the section has to be removed, because they lead to tissue folds, breakages and distensions, bad staining and poor section adhesion to slide.
The glass slides have to be clean before coating with adhesive solutions. A common coating solution contains gelatin and chrome and potassium alum. This solution needs to be clear. Lumps and precipitates are prevented during the drying process by draining thoroughly the slides after the immersion in the coating solution. On the other hand, the quality of the coating solution should be optimal to prevent the sections to fall off during the histological process.
6. Staining
Paraffin has to be completely removed before staining because paraffin leftovers hinder the penetration of dyes through the sample, decreasing the quality of the staining.
The solutions with dyes have to be clean and free from microorganisms to prevent precipitations and crystals (Figure 5). It is a good practice to filter the solutions before they are used.

When the procedure requires adding the staining solutions in drops onto the tissue section, the sample needs to be fully covered by the staining solution and drying has to be prevented when the staining time is long. Otherwise, the staining is not even through the tissue, and dye may precipitate in those regions where solutions evaporated.
The most common artifacts produced during staining are caused by a deficient dye clearing and by precipitations of the solution staining. Poor or strong staining of tissues can be fixed by adapting the staining time to the features of the sample, such as thickness, hardness, and so on.
7. Mounting
Once the tissue is stained, dehydration before mounting has to be complete to prevent little drops of water in the mounting medium (Figure 6). This can be sorted out by going back with the sections through clearing liquid, downgrading steps of alcohol, and finally water. Then, dehydration can be repeated with fresh liquids and steps with longer times. However, alcohol determines the staining intensity of the sample in some procedures, so sections may have to be stained again before dehydration.

The coverslip has to be clean, and it is manipulated just touching the edges. It should be placed with the mounting medium with care so not to form air bubbles. The amount of mounting medium has to be enough to cover all the sample, not less because parts of the sample may remain uncover, and not too much because a very thick layer of solidified mounting medium makes it impossible to use short focal distance objectives, as 100x objective. These objectives need to be very close to the sample to get a sharp image. Mounting media get more dense with time because the solvent evaporates. Thus, it is a good idea to keep close the mounting medium container to maintain a fluid compound. It is more difficult to obtain a thin layer with a dense mounting medium.
The section should not get dry between the clearing liquid and the mounting medium because air bubbles may appear (Figure 7). If some mounting medium escapes and gets to the external surfaces of the slide or the coverslip, which hinder the observation with the microscope, it can be easily removed with a sharp blade or cleaned with a bit of xylene or other clearing liquid.

8. General advices
When a histological procedure is tried for the first time, fixation, dehydration, embedding and the staining itself should be tested. Although general protocols are available, the standard times for each of the procedure steps are indicative. The common protocols have to be adapted according to the specific features of our samples and the results we want to achieve.
-
Bibliography ↷
-
Jimson S. Malathi L, Kumar GMK, Balachander N. 2016. Artefacts in histologycal section. Biomedical and pharmocology journal. 9: 843-845.
McInnes E. 2005. Artefacts in histopathology. Comparative clinical pathology. 13: 100-108.
-